Custom themes
Any user can create custom themes, but only Pro users can apply them. Select New Theme at the top right corner of the page to get started.
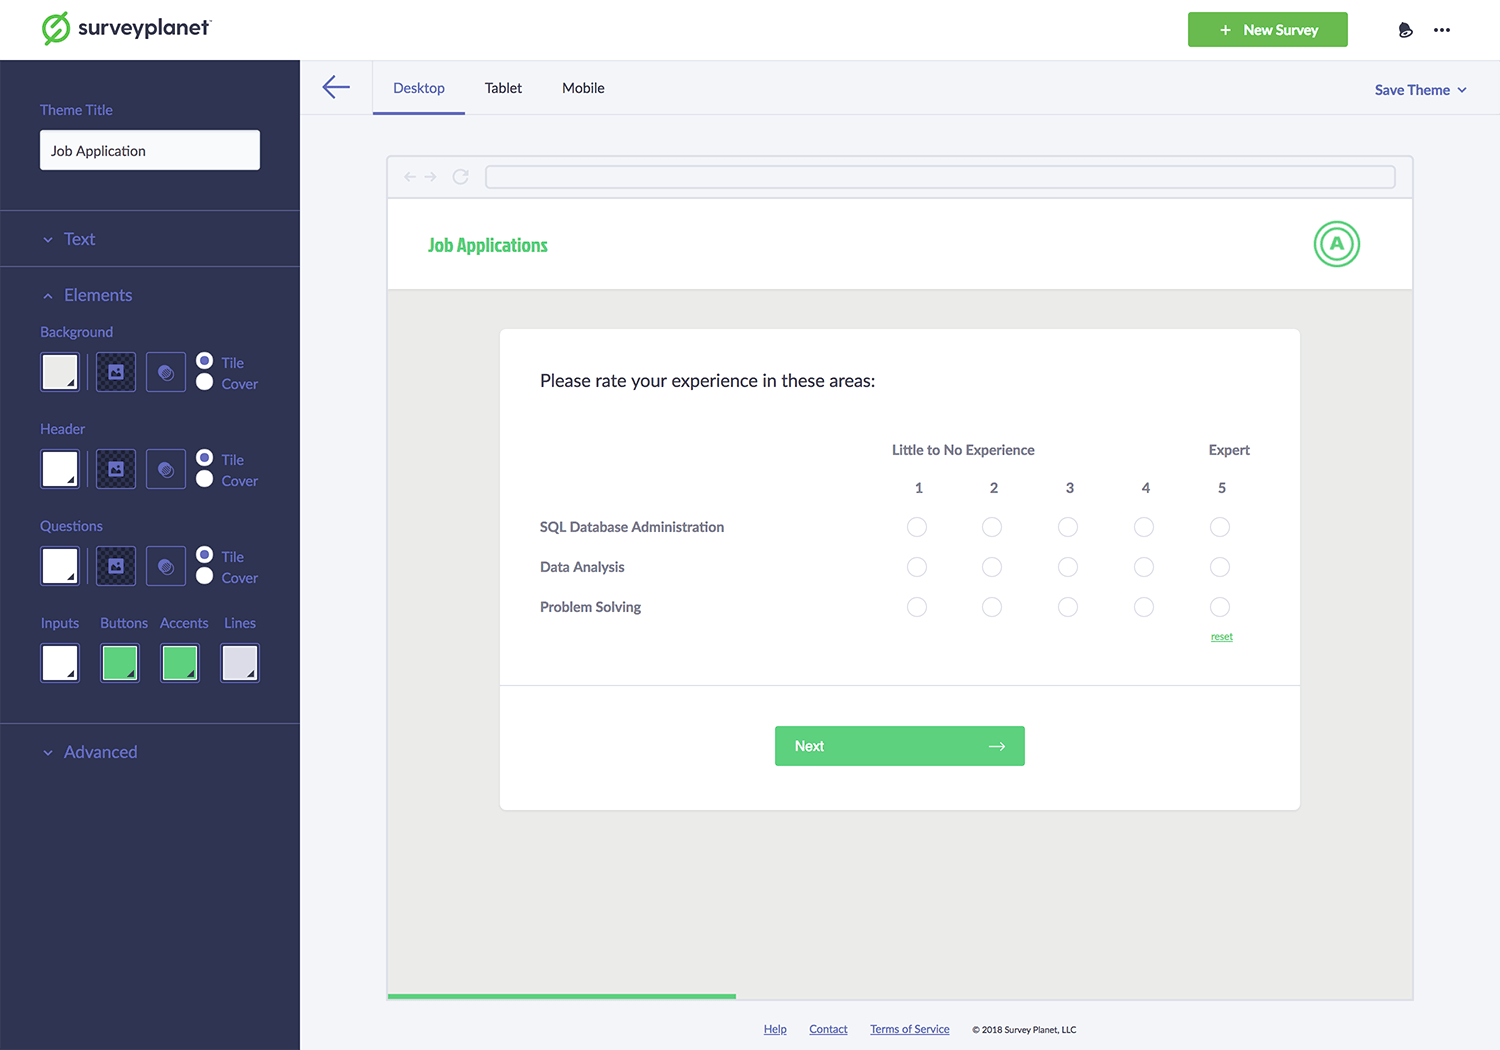
Theme title
When creating a custom theme, the first thing you’ll be asked to enter is a title. Enter a title in the Theme Title input field.
Survey text styles
You have 25 text styles to choose from for your survey. The font sizes default to the sizes that Surveyplanet uses for its templates. You can change these to any size you’d like.
The last thing you can change for text styles is the color. You can enter hex values, RGB values or use the built in color box, transparency tool and the color slider.
Change survey title styles
- Select the dropdown arrow next to Text.
- Select the font type dropdown arrow beneath Survey Title to choose from 25 options.
- Select in the font size box and use the slider to choose a font size.
- Select the color box and use the sliders to choose the color of your text. If you already know the RGB or hex value, select the displayed value and replace it with yours.
The survey preview will automatically update as you make these changes.
Change question title styles
- Select the dropdown arrow next to Text.
- Select the font type dropdown arrow beneath Question Title to choose from 25 options.
- Select in the font size box and use the slider to choose a font size.
- Select the color box and use the sliders to choose the color of your text. If you already know the RGB or hex value, select the displayed value and replace it with yours.
The survey preview will automatically update as you make these changes.
Change question subtitle styles
- Select the dropdown arrow next to Text.
- Select the font type dropdown arrow beneath Question Subtitle to choose from 25 options.
- Select in the font size box and use the slider to choose a font size.
- Select the color box and use the sliders to choose the color of your text. If you already know the RGB or hex value, select the displayed value and replace it with yours.
The survey preview will automatically update as you make these changes.
Change form label styles
- Select the dropdown arrow next to Text.
- Select the font type dropdown arrow beneath Form Labels to choose from 25 options.
- Select in the font size box and use the slider to choose a font size.
- Select the color box and use the sliders to choose the color of your text. If you already know the RGB or hex value, select the displayed value and replace it with yours.
The survey preview will automatically update as you make these changes.
Change button label styles
- Select the dropdown arrow next to Text.
- Select the font type dropdown arrow beneath Button Labels to choose from 25 options.
- Select in the font size box and use the slider to choose a font size.
- Select the color box and use the sliders to choose the color of your text. If you already know the RGB or hex value, select the displayed value and replace it with yours.
The survey preview will automatically update as you make these changes.
Survey element styles
Here you can change the color and/or add images to all the elements in your survey. The following elements can be styled. Note that with Background, Header, and Questions you can add images, change the image opacity, and make the image tile or cover the entire element.
- Background - Change the color and/or add an image to the background of the survey.
- Header - Change the color and/or add an image to the top header bar of the survey.
- Questions - Change the color and/or add an image to all the questions in the survey.
- Inputs - Change the color of text inputs, checkboxes, radio buttons, etc.
- Buttons - Change the color of the survey buttons.
- Accents - Change the accent colors in the survey (complete check, input focus outlines, etc.).
- Lines - Change the color of all the outlines and divide lines in the survey.
Change background styles
- Select the dropdown arrow next to Elements.
- To add/change the background color, select the color box and choose a color. If you already know the RGB or hex value, select the displayed value and replace it with yours.
- To add/change the background image, select the image box and choose from a provided pattern or upload your own image.
- To change the opacity, select the transparency box and then use the slider to adjust the opacity.
- By default, the image will Tile. To scale the image to the size of your background, select Cover.
Change header styles
- Select the dropdown arrow next to Elements.
- To add/change the header color, select the color box and choose a color. If you already know the RGB or hex value, select the displayed value and replace it with yours.
- To add/change the header image, select the image box and choose from a provided pattern or upload your own image.
- To change the opacity, select the transparency box and then use the slider to adjust the opacity.
- By default, the image will Tile. To scale the image to the size of your header, select Cover.
Change question styles
- Select the dropdown arrow next to Elements.
- To add/change the question color, select the color box and choose a color. If you already know the RGB or hex value, select the displayed value and replace it with yours.
- To add/change the question image, select the image box and choose from a provided pattern or upload your own image.
- To change the opacity, select the transparency box and then use the slider to adjust the opacity.
- By default, the image will Tile. To scale the image to the size of your question, select Cover.
Change input colors
To change the input color, select the color box underneath Inputs and choose a color.
Change button colors
To change the button color, select the color box underneath Buttons and choose a color.
Change accent colors
To change the accent color, select the color box underneath Accents and choose a color.
Change line colors
To change the line color, select the color box underneath Lines and choose a color.
Saving custom themes
After you create your custom theme, save it. Select Save Theme in the top right corner. This doesn’t apply the theme to your survey. The dropdown lets you choose Save & Apply or Save & Exit.
Editing custom themes
- To edit a custom theme you have already created, select the Themes icon on a survey.
- Select the All Themes dropdown at the top right of the page and choose My Themes.
- Select the Themes Options icon and choose Edit.
- Make your changes and select Save Theme.
Deleting custom themes
- To delete a custom theme you have already created, select the Themes icon on a survey.
- Select the All Themes dropdown at the top right of the page and choose My Themes.
- Select the Themes Options icon and choose Delete.
- Confirm that you want to delete your theme. This will permanently delete your theme.